Green Energy

Energy from renewable energy sources

We all consume huge quantities of energy every day. Where does it all go, you might ask? Let's think about a normal daily routine any of us might have:

In the morning, your clock radio wakes you up with an alarm. It draws electricity from an outlet. After you get up, you turn on the light, and take a shower with hot water from a central heating system that is heated by burning oil or gas. Then you dry your hair using an electric hair dryer, and brush your teeth with an electric toothbrush. For breakfast, you make a cup of coffee or tea. You boiled the water for it in an electric kettle. Before you went to bed, you made yourself a sandwich for lunch and stored it in the refrigerator. 
You ride to school on the bus or trolley, or your parents drive you in their car. The bus, trolley and car all use fuel. We could go on counting the ways you use energy throughout your day. The list would seem endless! To put it briefly: all of us need large amounts of energy.

Energy from oil, coal and nuclear power

And where does all that energy come from? We generate the majority of it from fossil fuels like gas, oil and coal. Some of our electricity also comes from nuclear energy. However, these types of energy do have various disadvantages:

  • The Earth’s reserves of fossil fuels are limited.
  • When we burn oil and coal, this produces harmful substances that pollute the environment, like CO2, which is responsible for the ongoing warming of the Earth's atmosphere.
  • Despite high safety standards, nuclear energy does carry with it the risk of a nuclear meltdown. In addition, it also produces nuclear waste which remains radioactive for thousands of years. 

Alternative energy sources are the solution!

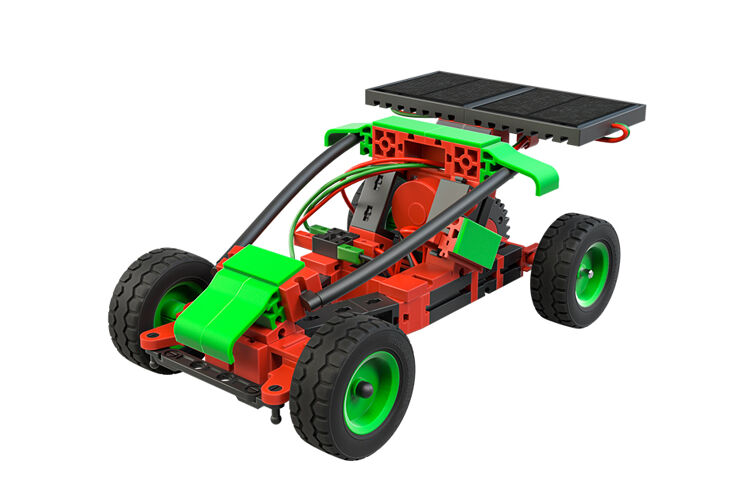
These are all good reasons to look closer at alternatives that are environmentally-friendly and available in almost unlimited supply. These types of alternative energy are available to us, and are called renewable energy. In the Green Energy building set, you will be learning about how power is produced from:
Water, wind, sun

In contrast to fossil fuels, these energy sources are unlimited and does not have the disadvantages indicated above. 

You will complete a variety of tasks to learn how to generate and store electricity using these energy sources to power fischertechnik models.

Tasks

What is energy?

We keep talking about energy, but what does energy actually mean, and how do you measure it?

You need energy:

  • to accelerate a body or 
  • to move it against a force, 
  • to heat up a substance, 
  • to compress a gas, 
  • to cause an electric current to flow or 
  • to emit electromagnetic waves. 
  • Plants, animals and people need energy to live. 

The unit used to measure energy and work is the joule (J). 

Converting hydro-energy into movement ... 

... using a water wheel
The invention of the waterwheel was a milestone in human technological development. It allowed people to use not only the power generated by their own muscles, but also mechanical energy as well – with the help of hydropower.

... with a gang saw
Have you ever noticed that many old sawmills were built by a river or stream? The reason is that they used hydro power as their energy source. Gang saws were used frequently. The water wheel drives the saw blades, making it possible for instance, to more easily manufacture boards sawed from a tree trunk.


Task 1: 
What are the disadvantages of using hydro-power in this way?

  • Energy can only be used in places with flowing water (rivers or streams).
  • Energy cannot be stored. It must be used immediately when it is available.
  • Energy is available only for a limited purpose.

How does hydropower become electricity?

As you have just learned, people have been using the kinetic energy of water for hundreds of years to directly power machines. During the course of industrialisation, people stopped using the hydropower directly, and instead began to use electric current. But how do we use hydropower to generate electricity?

Water turbine with LED

A water turbine is a turbine that allows us to make use of hydropower. In a hydropower plant, the fluid energy of the water is converted into mechanical energy using the water turbine. The turbine turns thanks to the flowing water. As the turbine shaft rotates, it drives a generator that converts the rotational energy into electrical current. The rotors in such turbines can have diameters of up to 11 m.

Now, build the model of a water turbine (see building instructions). Hold the water wheel under a tap and let it spin fast enough to light up the LED. Observe the rotational direction for the wheel indicated in the building instructions.


Task 1:

How does the water turbine work? 

The water wheel transmits its rotational energy to the transmission wheel. A V-belt (silicone ring) transmits the rotational movement to the drive wheel of the solar motor. This acts as a generator and converts the rotational energy into electrical energy, causing the LED to light up.

Note: The LED is only designed to show how the solar motor can be used to generate electricity. It may be operated with a maximum of 2 V direct current. Higher voltages will immediately destroy it. Also ensure that the motor does not come into contact with water.

Wind energy
People have been using wind energy for their own purposes for centuries. Wind has been used, for instance, to transport people on sailboats and balloons, and wind energy has been used to do mechanical work with the help of windmills and water pumps.

Converting wind energy into movement

The windmill model converts wind energy into kinetic energy.

A wind turbine is a technical assembly that generates rotational energy with the help of its blades, which are made to turn by the wind (kinetic energy). The rotational movement is transmitted to the lower part of the structure by a large cog wheel or toothed gear and a drive shaft. Gear wheels and guide gears transmit the rotational movement to the mill stone.

Build the model of a windmill (see building instructions).


Experiment:

What can you do to move the windmill? Try different techniques (blow on it, use a hair dryer, use a fan, use wind, or hold the model in your hand and turn it in a circle as fast as you can).


How does wind energy become electricity?

After the discovery of electricity and the invention of the generator, it did not take long for people to have the idea to use wind energy to generate power. Initially, they just converted the concept of a windmill. Instead of converting the kinetic energy of the wind into mechanical energy, a generator was used to generate electrical energy. As fluid mechanics became more advanced, structures and rotor shapes became more specialised, and today we use wind turbines and wind generators. Since the oil crises of the 1970s, people have been conducting more research on alternative energy worldwide, and the development of modern wind generators has increased.


Task: 

Build the windmill, wind turbine, or wind generator model to light up an LED. 
(See building instructions)

The wind turbine transmits its rotational energy to the transmission wheel. A V-belt (silicone ring) transmits the rotational movement to the drive wheel of the solar motor. This acts as a generator and converts the rotational energy into electrical energy, causing the LED to light up. In the wind turbine model, the propeller directly drives the solar motor. Before you start, check the blades once again to ensure the correct direction of rotation and correct polarity of the LED (see building instructions).

Experiment:

Compare the wind energy models. Which model turns with just a small amount of wind, and which needs a strong wind? Try different techniques once again (blow on it, use a hair dryer, use a fan, use wind, or hold the model in your hand and turn it in a circle as fast as you can).

Solar energy - Fundamentals

Solar energy is the energy generated by the sun through nuclear fusion; some of this energy reaches the earth as electromagnetic radiation (radiant energy). The majority of this energy is used to warm our planet. 

We can also use solar technology to harness solar energy for a variety of purposes: 

  • solar collectors generate heat and warmth 
  • concentrated solar power systems generate electricity by converting heat into water vapour 
  • solar cookers and solar ovens heat food 
  • solar cells generate direct current (photovoltaics)

Converting solar energy into electricity

A solar cell or photovoltaic cell is an electrical component that converts the radiant energy in light (generally sunlight) directly into electric energy. The physical principle behind this conversion is the photovoltaic effect. A solar cell should not be confused with a solar collector, which uses the sun's energy to heat a transmission medium (usually hot water). 

Solar cells are made of silicon. Silicon blocks are cut into thin slices approx. 0.5 millimetres thick. The slices are then contaminated with different impurity atoms, which creates an imbalance in the structure of the silicon. This produces two layers, the positive p-layer and the negative n-layer. 

To put it simply, the flow of electricity is created when electrons from the n-layer, excited by the incident light, move through the connected device (such as a solar motor) to the p-layer. The more light (energy) hits the cell, the more the electrons move. When a solar cell is connected to a device, it will move in this direction. You can imagine the flow of electricity as a circuit, where electrons are continuously arriving at the n-layer, then moving back to the p-layer. This flow of electrons causes current to flow and makes the motor turn.

Solar models


Solar models with one solar module

The solar module used in the Green Energy building set consists of two solar cells connected in series. It delivers a voltage of 1 V and a maximum current of 440 mA. The solar motor has a rated voltage of 2 V, but starts to turn at 0.3 V (idling, meaning that the shaft of the motor does not have to drive a model).

To complete initial experiments with the solar module, build the helicopter or sky dancer model (see building instructions).


Experiment 1:

Determine what level of brightness is required to turn the motor. You can use a lamp with a light bulb to do so. Test your model outdoors in the sunshine as well.

Experiment 2:

If you have an ammeter and voltmeter, you can use them to measure the voltage (V) from which the motor turns and the current (A) that flows as it does.

To simplify the measurements, you can use the measuring devices as shown. You can connect the two plugs of the cable to the points to be measured on the model. Now, you can use the measuring tips of your voltmeter or ammeter on the light to complete your desired measurement.

Experiment 3:

Conduct experiments to find answers to the following questions:

  • How bright does it need to be for the motor to turn sufficiently fast?
  • What light sources can be used to generate energy?

Solar models with two solar modules - Parallel switching

Switching two solar modules in parallel delivers more electricity for the same voltage. You need this type of circuit for the new rotary table model (see building instructions).


Experiment 1:
 If you have an ammeter and voltmeter, you can use them to measure the voltage and current the parallel circuit delivers.

Experiment 2:
Test the parallel circuit by connecting one and then two solar modules to the solar motor in the model.

Solar models with two solar modules - Series connection

Solar vehicles receive the majority of their operating power directly from the sun. They are fitted with solar cells on their surface that convert the solar energy on the vehicle into electrical current. As electric vehicles, they often have a method of energy storage (usually batteries) so that they can continue to drive for at least a limited time even in low light or when there are clouds. 

The solar vehicle model applies the principle of series connection of solar cells, which means more voltage for the same current. Build the model according to the building instructions and wire it as described in the wiring diagram.

Solar vehicle

In this model you will become familiar with a new component, the button. Buttons are called touch sensors. If you press the red button, a contact is moved mechanically within the housing and current flows between contacts 1 and 3. At the same time, the switching connection between connection points 1 and 2 is interrupted.

Buttons or switches are used in two different ways: 

Buttons as “make contacts”

The two wiring diagrams show the test setup. The positive terminal of the solar module is connected to contact 1 of the button, the solar motor is connected to contact 3 of the button and to the negative terminal of the solar module. When the button is not activated, the motor is switched off. If you press the button, the circuit between contact 1 and contact 3 is closed and the motor runs.

Buttons as “break contacts”

In the break contact, the positive terminal of the solar module is connected to contact 1 of the button, the solar motor is connected to contact 2 of the button and to the negative terminal of the solar module. When the button is not activated, the motor is running. If you press the button, the circuit between contact 1 and contact 2 is open and the motor turns off.  

What is the function of the button as a “make contact”? When sunlight hits the solar cell and the button is activated, the worm gear of the solar motor starts to turn and sets the toothed gear in motion. The button in the solar vehicle model is connected as a make contact.

Experiment 1: 

Determine the light intensity required to make the solar vehicle move.

Experiment 2:

Test the influence that light intensity has on the speed of the solar vehicle. How much time does the solar vehicle need to travel one meter

Experiment 3:

Compare the movement of the solar vehicle when you use series and parallel connection.

Storing electrical energy

Storing electrical energy

All vehicles that move using the sun's energy are not automatically considered solar vehicles. For example, if a vehicle fills up with electricity only at a solar filling station, then the electricity may have been generated from sunlight, but the vehicle itself is an electric vehicle.

Electric vehicle with solar charging station

Build the electric vehicle model with the solar charging station (see building instructions). 

You have certainly found in your experiments with the solar modules that this type of energy generation has a disadvantage. The models stop working as soon as they are away from the light source or in a shadow. Because of this, it is important to equip the models with an energy storage system charged with solar energy for such times.

Goldcap energy storage unit

The Goldcap contained in the building set is one such energy storage option. It consists of two pieces of activated carbon that are separated from one another by only a thin layer of insulation. The Goldcap stands out for its extremely high capacity. The capacitor you are using has a capacity of 10 F (Farad).

You can use the Goldcap like a small battery. The advantage it has over a battery is that you can charge the Goldcap very quickly; it cannot be overloaded, and does not undergo deep discharge. Despite the name, unfortunately, there’s no gold inside! Goldcap is a product designation the manufacturer assigned to this special kind of capacitor.

Danger, explosion hazard! The Goldcap may never be connected to a voltage greater than 3 V; otherwise, it may explode! Never connect the Goldcap to a normal 9 V fischertechnik power supply.

Fill up the electric vehicle - to do so, connect it to the solar filling station. When there is light energy available, the Goldcap will charge. Once it is charged (LED lights up), connect the Goldcap to the solar motor. When the button is activated, the vehicle will start moving. 


Experiment 1:

If you have a measurement device, you can measure the voltage on the Goldcap while you charge it. You can read off how much of the charging process has been completed. 

Experiment 2:

  • Test to see how long the car can run on one tank. 
  • How fast can it go?
  • How much time does the vehicle need to travel one meter?

What is the function of the LED in the solar station? It serves as a charging control indicator. Once the Goldcap is fully charged, the LED lights up.

Antiparallel switching

Antiparallel– what does this term mean? It is very simple - two solar modules are connected in parallel so that the plus terminal of one solar module is connected to the minus terminal of the other solar module. How does this circuit behave when exposed to light? The image shows you. In the centre, both solar modules are exposed to the same light intensity, so both voltages of the solar modules increase and the measuring device shows 0 V. If one solar module is not exposed to the light source, only the illuminated module generates current and the measuring device deflects in that direction. 

You will apply this principle in the next two models.

Barrier

Build the model of the barrier using the building instructions. In this model, a barrier will open and close using solar energy. The trick is that the motor will not move if both solar modules are exposed to the same level of brightness. If you cover one of the modules, the motor will begin to move and close the barrier. If you cover the other module, the barrier will open again. In this way, you can use this circuit to replace a pole reversing switch.


Task:

Create a sketch to show how the motor's direction of rotation (or current direction on the motor) is changed in this model when one of the solar modules is covered.

If both modules are exposed to the same level of light, the voltages increase and the motor remains stopped. If one module is covered, the voltage of the illuminated module reaches the motor. This turns, closing or opening the barrier.

Eco-house

In the next task, you will be combining all of the energy sources you have been learning about so far. The owners of eco-houses use a variety of different renewable energy sources. This type of energy production reduces their costs for heating and power. Now, build the eco-house model (see building instructions).

Task: 

 Research online to learn about different renewable energy sources. 

The LED in the model represents many individual devices that use electricity, such as lights, TVs, and much more. 

Task 1:

First, the LED will be powered by the wind turbine. 

Wire the electrical components as shown in the building instructions. The disadvantage of this type of circuit is that the LED will only be illuminated if there is no wind. 

Task 2:

In this task, the LED will be powered by the solar cell. 

Wire the electrical components as shown in the building instructions. The disadvantage of this type of circuit is that the LED will not be illuminated if there is no solar energy. 

Task 3:

 In this task, you will combine wind and solar energy. The Goldcap is used to store energy. 

Wire the electrical components as shown in the building instructions. This type of circuit compensates for the disadvantages of the two tasks above. 

When there is wind (mini button not activated), the house draws power from the wind. The LED is illuminated. 
At the same time, the solar system is charging the Goldcap. 

When the wind stops, the mini button is activated. The LED is then supplied with solar power from the Goldcap.


Outlook H2FuelCellCar

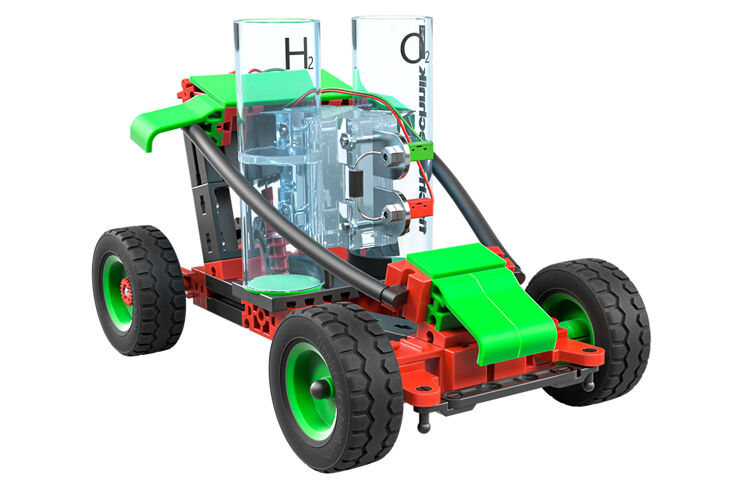
In addition to the renewable energy sources introduced in this building set, the H2 Fuel Cell Car building set includes a true highlight of renewable energy – the fuel cell. You can operate models you are already familiar with from the Green Energy building set using this energy source, as well as other interesting technical models.

Go to product page

cd-green-58bb58464c-46z77